81688-Sample-130

Melbourne Sunset Wedding Photography – Orange Tone Atmosphere Scenery

Melbourne Sunset Wedding Photography: How to Nail That Orange-Toned Dream

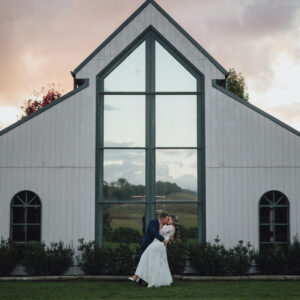
There is a reason everyone says golden hour is the best time for wedding photos. But let us be honest, it is not really about the gold. It is about the orange. That deep, saturated, almost unreal orange that fills the sky for about 20 minutes before the sun disappears. Melbourne gives you some of the most dramatic sunset wedding backdrops on the planet, and if you know where to stand and when to shoot, you can capture portraits that look like they belong in a film.

wedding photography melbourne

Why Orange Tone Is the Secret Weapon in Wedding Photography

Most couples want their photos to feel warm. But warm is vague. Orange tone is specific. It is that rich, honey-colored light that turns skin into porcelain, makes white dresses glow, and turns an ordinary street into something cinematic. It is also the hardest tone to get right because the window is so short and the light shifts so fast.

The orange you see during a Melbourne sunset is not the same orange you get in tropical destinations. It is cooler, more muted, and it fades into purple and pink within minutes. That is what makes it so beautiful and so frustrating at the same time. You have maybe 15 to 25 minutes of usable light, and if you are not ready, it is gone.

What Actually Creates That Orange Glow

It comes down to atmosphere. When the sun is low on the horizon, its light has to travel through more of the earth’s atmosphere to reach you. The shorter blue wavelengths scatter away, and the longer orange and red wavelengths make it through. That is basic physics, but for wedding photography, it means the light wraps around your couple in a way that feels almost three-dimensional.

Melbourne’s dry air and occasional haze amplify this effect. Dust particles and humidity in the atmosphere add texture to the light. You get layers of color, not just a flat orange wash. The sky near the horizon burns deep orange, then fades to peach, then to soft lavender above. That gradient is what gives sunset wedding photos their depth.

Melbourne Locations That Deliver Orange-Toned Sunset Magic

Not every sunset spot in Melbourne gives you the same orange. Some give you pink, some give you purple, and some give you a flat, dull gray. You need to pick your location based on what you want the sky to do behind your couple.

St Kilda Beach and the Pier

This is the classic for a reason. The pier extends into Port Phillip Bay, which means you get open sky on one side and water reflecting the sunset on the other. The reflection doubles the orange. The pier itself gives you leading lines that draw the eye straight to your couple.

Go about 45 minutes before sunset. Set up near the end of the pier or on the grassy area near the kiosk. The palm trees there catch the light beautifully and add a silhouette element that frames your couple without any effort. The beach crowds thin out by late afternoon, so you get clean backgrounds.

The water is calm on most evenings, which means the reflection is mirror-smooth. If there is any wind at all, the water breaks up the reflection into a thousand orange sparks. Both looks are stunning, just different.

Williamstown and the Bay

If you want drama, head to Williamstown. The beach is wide and open, and the view across the bay toward the city skyline gives you something St Kilda cannot. The sun sets over the water, and the city buildings catch the last light and turn gold.

The old boat sheds along the waterfront add texture and character. Rusty metal, weathered wood, peeling paint, all of it looks incredible in orange light. Your couple can lean against a shed, walk along the jetty, or stand on the sand with the city behind them. Every angle works because the light is coming from behind and wrapping around everything.

The Narrabeen-style rock formations near the point give you foreground elements that anchor the frame. Dark rocks against an orange sky is one of the most reliable compositions in wedding photography, and it never gets old.

Royal Park and the City Skyline

For couples who want urban sunset without the beach, Royal Park delivers. The open grassland gives you a clean, minimal foreground, and the Melbourne skyline rises in the background. When the sun sets behind the city, the buildings become silhouettes and the sky turns into a canvas of orange, pink, and deep blue.

The elm trees in the park create natural frames. Shoot through the branches and let the sun peek through. The light filters through the leaves and creates dappled orange spots on the ground and on your couple. It looks effortless but it requires you to be in the right spot at the right time.

How to Capture That Orange Tone Without Ruining It in Post

Getting the orange right starts in-camera. If you blow it there, no amount of editing will save you.

White Balance and Exposure Decisions

Do not shoot auto white balance. Set it manually to around 4500K to 5000K. This keeps the orange warm and rich instead of letting the camera cool it down to neutral. If you shoot RAW, you can adjust this later, but getting it close in-camera gives you a better starting point.

Expose for the highlights. The sky is the brightest part of the frame, and if you let the camera meter for the whole scene, it will underexpose the sunset and kill the orange. Spot meter on the sky near the horizon and lock that exposure. Your couple will be slightly darker, but that is fine. You can lift the shadows in post without destroying the tone.

If you want silhouettes, expose even lower. Let the couple go dark and keep the sky rich. Silhouettes in orange light are some of the most iconic wedding photos you will ever take.

Composing With the Sun Behind Your Couple

Backlighting is the move. Put the sun directly behind your couple and let it rim their hair, their shoulders, the edges of their dress. This creates that glowing outline that separates them from the background and makes them look like they are lit from within.

Do not put the sun dead center behind their heads. That creates a blown-out white hole. Offset it slightly to one side. Let it peek out from behind a shoulder or a tree branch. This gives you a controlled flare that adds warmth without washing out the image.

Use lens flare intentionally. A small amount of flare in the corner of the frame adds to the orange mood. Too much and it looks cheap. Find the balance by changing your angle slightly until the flare sits where you want it.

Timing Your Sunset Session Like a Pro

The math is simple but people get it wrong every time. Sunset in Melbourne varies from about 5pm in winter to 8:30pm in summer. You need to be at your location at least 40 minutes before the actual sunset time. The best light starts about 30 minutes before the sun hits the horizon.

Check the exact sunset time the morning of your shoot. Weather apps give you this down to the minute. Then work backward. If sunset is at 7:15pm, you need to be shooting by 6:45pm at the latest. The orange tone peaks between 6:45 and 7:05pm. After that, it shifts to pink and purple, which is beautiful but not what you came for.

Have your couple arrive 15 minutes before you start shooting. They need time to settle in, get comfortable, and stop thinking about the camera. The first 10 minutes of any session are usually stiff and awkward. By the time the light hits, they should be relaxed and natural. That is when you get the real shots.

One more thing. Shoot vertical and horizontal. The orange sky fills a vertical frame beautifully, but horizontal frames let you include more of the environment. Give your couple both options so they have variety when they see the final gallery. And do not forget to shoot a few tight details in that light. Hands intertwined, rings catching the sun, the hem of a dress glowing orange. Those small moments are what people remember most.

81688-Sample-164

Melbourne afternoon wedding photography with soft natural lighting

Melbourne Afternoon Wedding Photography: The Soft Light Everyone Is Chasing

There is a reason some of the most beautiful wedding portraits were never taken at sunrise. Afternoon light in Melbourne has a quiet confidence to it. It is warm without being harsh, golden without being overdone, and it wraps around your couple like it was made for them. If morning mist gives you drama, afternoon soft light gives you intimacy. And for couples who want their wedding photos to feel like a slow, unhurried love story, this is the window you want.

wedding photography melbourne

What Makes Afternoon Light So Different From Golden Hour

People confuse these two all the time, but they are not the same thing. Golden hour is that narrow band right before sunset when everything turns amber and the shadows stretch long. It is gorgeous, yes, but it lasts maybe 20 minutes and the light changes fast. You are racing the clock.

Afternoon soft light, on the other hand, hits from about 2pm to 4:30pm depending on the season. It is more diffused, more even, and it does not demand that you rush. The sun sits higher but still at an angle that creates gentle modeling on faces. Shadows are there but they are soft-edged, not dramatic. Skin tones look warm and natural. Dresses catch the light without blowing out. It is the kind of light that makes everyone look good without any heavy editing.

How Cloud Cover Becomes Your Best Friend

Here is something most couples do not realize. A perfectly clear afternoon in Melbourne can actually be too bright for soft portraits. You want some cloud cover. Thin, high-altitude clouds act like a giant softbox spread across the sky. They break up the direct sunlight and turn it into something wrapped and diffused.

Overcast afternoons are even better. The whole sky becomes one massive light source. There are no harsh shadows at all. Every face gets the same beautiful, even illumination. This is why some of the most sought-after wedding photographers in Melbourne actually pray for a cloudy day. It sounds counterintuitive but the results speak for themselves.

Partly cloudy is the sweet spot though. You get patches of direct sun breaking through, which creates those gorgeous dappled light spots on the ground and on your couple. It adds texture and dimension without any of the harshness. If you see clouds rolling in around 1pm, do not panic. That is your green light.

Melbourne Locations That Shine in Afternoon Light

The city has a way of looking completely different after lunch. The crowds thin out, the light angles shift, and certain spots just come alive.

Fitzroy Gardens and the Botanical Backdrops

Fitzroy Gardens is where you go when you want romance without pretension. The grand avenues of elm trees create natural tunnels of light. In the afternoon, the sun filters through the canopy and throws soft, scattered patterns on the ground. Your couple can walk slowly down these paths and every step looks like a movie frame.

The ornamental lake gives you reflections without the chaos of a busy waterfront. The rose gardens, if you are shooting in the right season, add pops of color that look incredible against the warm afternoon tones. And the best part? It is all within the city, so you are not losing hours driving somewhere remote.

The Royal Botanic Gardens right next door works the same way but with a more open, expansive feel. The lake there catches afternoon light beautifully, and the skyline of the CBD rises in the background without overwhelming the scene.

The Yarra River and Southbank Promenade

Southbank in the afternoon has a relaxed energy that is hard to fake. The river reflects the sky and the light bounces off the water onto your couple’s faces. It is a natural fill light that no reflector can match. Walk along the promenade, find a quiet bench, and let the light do its thing.

The pedestrian bridges give you elevation and clean lines. Standing on the bridge with the river below and the city behind you creates a composition that is simple but powerful. The afternoon light keeps everything warm and cohesive so you do not have to worry about mixing color temperatures.

Inner-City Laneways With Afternoon Glow

This is the one people overlook. Laneways like Degraves Street, Centre Place, and AC/DC Lane look incredible in afternoon light. The narrow walls bounce light around, creating this warm, enclosed feeling. The sun hits one side of the lane and the other side stays in soft shadow. That contrast is perfect for portraits.

Go between 2pm and 3:30pm when the sun is high enough to reach into the lanes but still at an angle. The cafes and restaurants are quiet, so you get clean backgrounds without tourists photobombing every shot. The brick walls take on a rich, warm tone that makes every color in the frame pop.

Shooting Techniques That Make Afternoon Light Work For You

The light is beautiful, but you still need to know how to use it. A few technical choices will separate good shots from great ones.

Exposure and White Balance Decisions

Afternoon light is generally forgiving, but it can trick your camera’s meter. If you are shooting in open shade, the meter will want to overexpose because it sees mostly bright sky. Dial in about minus one-third to minus two-thirds of a stop to keep your exposure accurate. You want the light to look bright, not blown out.

White balance is where afternoon light really shines. Set it to around 5500K to 6000K and you get that clean, natural warmth. If you are under tree cover, the light gets cooler and greener. Bump your white balance toward 6500K to compensate. If you want the warmth dialed up even more, shoot in shade and let the ambient light do the work. The result is a rich, golden tone that looks expensive without any color grading.

Using Natural Frames and Depth

Afternoon light gives you something morning light often does not: time. You can move slowly, scout compositions, and build layers into every frame. Use doorways, archways, tree branches, and fences as natural frames. They draw the eye to your couple and add depth that a flat, open field never will.

Shoot with a wide aperture like f/2.8 or f/4 when you want the background to melt into a creamy blur. The afternoon light makes bokeh look especially smooth and warm. If you want more of the environment in focus, stop down to f/5.6 or f/8. Both approaches work, but the shallow depth of field is what gives afternoon wedding portraits that dreamy, editorial feel.

Get low sometimes. Shooting from waist height or even the ground changes the entire mood. It makes your couple look powerful and the background becomes a wash of warm color. It also eliminates distracting elements at eye level like passing cars or stray pedestrians.

Working With Shadows Instead of Fighting Them

In harsh midday sun, shadows are the enemy. In afternoon soft light, shadows are your collaborator. They add shape to faces, define jawlines, and create dimension that flat light never could. Do not rush to fill every shadow with a reflector. Let some of them stay. A half-lit face with soft shadow on one side is infinitely more interesting than a face lit evenly from every direction.

If the shadows are too deep for your liking, a simple white bounce card held just out of frame can lift them without killing the mood. Even a white wall nearby works as a natural reflector. The goal is not to eliminate shadow but to control it.

Timing Your Session Around the Light

The window is real, and it moves. In summer, the harsh midday sun peaks around 12:30pm and does not soften until close to 3pm. In winter, the light is softer earlier, around 1:30pm to 2pm, and fades by 4pm. Always check the sun position before you arrive.

Start your session when the light first turns soft, not when it is at its peak. The first hour of soft afternoon light is often the most magical because the sun is still strong enough to create dimension but diffused enough to stay gentle. As the afternoon goes on, the light gets flatter and cooler. That is not bad, it just means a different look.

If you have the flexibility, shoot two short sessions instead of one long one. One in the late morning around 11am when the light is still fresh, and one in the afternoon around 3pm when everything goes golden. You get two completely different moods from the same day, and your couple gets variety without exhaustion.

81688-Sample-153

Morning wedding photography in Melbourne with a misty atmosphere effect

Melbourne Morning Mist Wedding Photography: How to Capture That Dreamy Fog Glow

There is something almost sacred about a Melbourne morning wrapped in fog. The city slows down, the light turns golden and diffused, and every street corner becomes a potential frame for the most ethereal wedding portraits you will ever take. If you have been dreaming of wedding photos that feel like a painting rather than a snapshot, morning mist is your secret weapon. And Melbourne, with its unpredictable weather and stunning urban-meets-nature backdrop, is one of the best places on earth to make it happen.

wedding photography melbourne

Why Morning Fog Is the Ultimate Wedding Mood Setter

Fog does something no filter ever could. It softens everything. Harsh buildings disappear into a gentle haze, trees become silhouettes, and your bride looks like she just stepped out of a fairy tale. The light during the golden hour, roughly 30 minutes before sunrise to one hour after, wraps around your subjects in a way that feels impossible to replicate at any other time of day.

The best conditions? Think post-rain mornings when humidity is high, or those crisp autumn and early spring days when temperature swings create natural mist. You want little to no wind, because wind kills fog fast. Check a weather app the night before for humidity, wind speed, and visibility. If the numbers line up, set your alarm early and trust the process.

The Science Behind the Glow

When sunlight hits fog at a low angle, it scatters in every direction. This is called the Tyndall effect, and it creates those breathtaking beams of light cutting through the mist. For wedding photos, this means your couple can be backlit or side-lit with the sun shooting through the fog behind them, turning their outlines into a soft golden rim. It is cinematic without trying too hard.

The key is to expose for the highlights, not the shadows. Push your exposure compensation up by about two-thirds to a full stop. This keeps the fog looking pure and luminous instead of muddy and gray. Underexpose even slightly and you lose all that magic. Overexpose and the fog blows out completely. That sweet spot is narrow but worth chasing.

Best Melbourne Locations for Misty Morning Wedding Shots

Melbourne gives you options that most cities simply cannot match. You have urban charm, coastal drama, and bushland mystery all within reach.

Urban Fog: Laneways and Iconic Architecture

Hosier Lane is a no-brainer. That 50-meter stretch of ever-changing street art becomes even more photogenic when fog rolls in. The colors pop against the gray, and your couple can walk right through it like they own the city. Go early, before the crowds wake up. The light is better and you get the whole lane to yourselves.

Flinders Street Station is another goldmine. That iconic yellow dome glowing through the mist with your couple sitting on the steps? Pure Melbourne. The Victorian-era columns catch the first light and turn amber. It feels timeless without any effort on your part.

Federation Square right across the river gives you open space, the Yarra River reflecting the fog, and modern architecture that contrasts beautifully with the softness of the mist.

Coastal and Nature Spots

If you want drama, head toward the coast. The Great Ocean Road area delivers cliffs, ocean spray, and fog rolling in off the water. Rocky outcrops near the shore make incredible foreground elements, and the contrast between dark rock and white mist is stunning.

For something quieter, the Dandenong Ranges or any of Melbourne’s bushland parks work wonders. Eucalyptus trees disappear into the fog at different distances, creating natural layers of depth. Ferns, moss, and old trunks give you that fairy-tale forest vibe without leaving the city.

Carlton Gardens and the Royal Exhibition Building area also deliver if you want something grand and architectural. The gardens in morning mist have a completely different energy, and the Exhibition Building’s dome rises out of the fog like a ghost from another century.

Camera Settings and Techniques That Actually Work

Getting the shot is half the battle. Getting it right in-camera saves you hours in post.

Dial In These Settings Before You Shoot

Shoot manual or aperture priority. Set your aperture between f/8 and f/11 for deep depth of field, because you want the mist to feel layered, not just a blurry white wash. Shutter speed can range from 1/30th of a second up to 2 seconds if you are on a tripod. Keep ISO as low as possible, ideally 100 to 400, because fog already eats contrast and you do not want noise making it worse.

White balance around 5000K gives you that cool, fresh morning tone. But if you want warmth and mood, bump it toward the shady or cloudy preset. Either direction works, just be intentional.

A polarizing filter is your best friend here. It cuts through the haze just enough to give the fog real texture and depth without killing it. A graduated neutral density filter helps balance the bright sky against darker foreground elements, which is critical when the sun is low and the contrast is wild.

Compose With Layers, Not Just Subjects

The biggest mistake photographers make with fog is shooting a couple standing in a white void. Boring. Instead, build three layers into every frame. Foreground: a dark tree branch, a rock, a fence. Midground: your couple, a boat, a building half-hidden in mist. Background: distant hills, the sun breaking through, the skyline fading away.

This is what separates a fog photo from a foggy photo. The foreground gives the viewer something to hold onto. The midground is your story. The background is your atmosphere.

Use leading lines too. A road, a river, a row of trees, a bridge, anything that draws the eye into the frame and deepens the sense of space. And do not be afraid of negative space. A big area of clean mist around your couple creates that minimalist, almost Chinese-painting feeling that is incredibly elegant for wedding work.

Post-Processing: Less Is More

In Lightroom or ACR, lift the contrast slightly but do not overdo it or the fog turns dirty. Pull down the highlights to recover detail in the mist. Use the dehaze slider, but gently. Too much and you erase the very thing you came out to shoot.

For color grading, cool blue-teal tones enhance that fresh, ethereal morning feeling. Warm orange-yellow tones add romance and intimacy. Pick a direction and commit.

If you are editing on your phone, Snapseed’s curve tool and local adjustments let you sculpt the fog layer by layer. VSCO filters like A6 or HB2 are built for this kind of moody, desaturated look.

Practical Tips That Will Save Your Shoot

Fog means low visibility. Watch your step, especially near water or cliffs. The ground will be wet, so bring something to wipe your lens and keep your gear dry.

Arrive at least 30 minutes before your planned shoot time. Fog moves fast and the light changes faster. Scout the location the day before if you can. Know where the sun will rise, where the mist will collect, and where your couple can stand safely.

Bring a tripod. You will need it. Morning light is weak and you will want sharp images at low ISO. A sturdy tripod is non-negotiable.

And one last thing: do not chase the sun. The most magical fog photos are often taken with your back to the sunrise. The light wraps around your subjects from behind, the fog glows, and the sky behind you turns into a canvas of pink and gold. That is the shot people remember.