Melbourne wedding photography – Backlighting portrait photography and post-production lighting enhancement
Enhancing Backlit Wedding Portraits in Melbourne: Effective Post-Processing Lighting Techniques
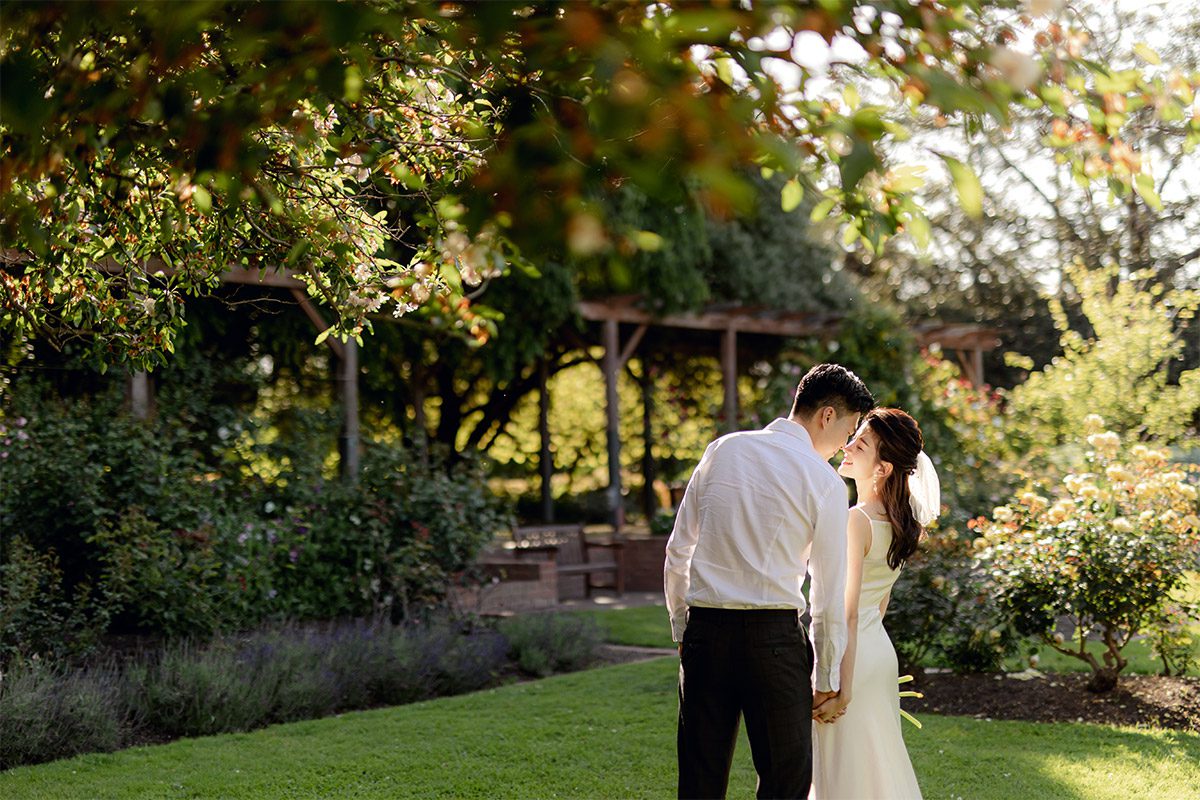
Backlit wedding portraits in Melbourne offer a unique and romantic aesthetic, with the sun casting a soft, golden glow around the couple. However, capturing these moments can sometimes result in underexposed subjects, as the intense backlight overwhelms the camera's sensor. Fortunately, post-processing techniques can help you balance the exposure and bring out the details in the couple's faces, ensuring your wedding photos are both stunning and well-lit.
Understanding the Challenges of Backlit Photography
Backlit scenes present several challenges for photographers, especially when it comes to exposure. The strong light source behind the subjects can cause the camera's metering system to underexpose the foreground, leaving the couple's faces in shadow. This can result in a loss of detail and a flat, unappealing look. To overcome this, it's essential to understand how to use post-processing tools to add light and balance the exposure.
Assessing the Image Before Editing
Before diving into post-processing, take a close look at your backlit wedding portrait. Identify the areas that need the most attention, such as the couple's faces, clothing, and any other important details. Pay attention to the overall tone of the image and the balance between the highlights and shadows. This assessment will guide your editing decisions and help you achieve a natural-looking result.
Techniques for Adding Light in Post-Processing
Once you've assessed your image, it's time to start adding light. Here are some effective techniques to help you enhance backlit wedding portraits:
Using the Dodge Tool for Localized Lighting Adjustments
The dodge tool is a powerful tool for selectively brightening areas of your image. In the case of backlit wedding portraits, you can use it to lighten the couple's faces, bringing out their features and adding a sense of warmth. Start by selecting a soft brush with a low opacity setting to avoid overdoing it. Then, gently brush over the areas you want to brighten, gradually building up the effect until you achieve the desired result.
Applying Gradient Masks for Balanced Exposure
Gradient masks are another useful technique for adding light to backlit images. They allow you to create a smooth transition between the bright background and the darker foreground, resulting in a more balanced exposure. To use a gradient mask, create a new layer and apply a gradient that fades from white to transparent. Position the gradient so that it covers the area you want to brighten, then adjust the opacity and blend mode of the layer to achieve a natural-looking effect.
Utilizing Curves Adjustments for Overall Tone Control
Curves adjustments are a versatile tool for controlling the overall tone of your image. They allow you to adjust the brightness and contrast of different tonal ranges, giving you precise control over the final look of your photo. For backlit wedding portraits, you can use curves to brighten the midtones and shadows while maintaining the brightness of the highlights. This will help to bring out the details in the couple's faces and create a more balanced and visually appealing image.
Refining the Lighting Effect for a Natural Look
After adding light to your backlit wedding portrait, it's important to refine the effect to ensure it looks natural and believable. Here are some tips to help you achieve a polished result:
Paying Attention to Skin Tones
When adding light to the couple's faces, be mindful of their skin tones. Over-brightening can result in unnatural-looking skin that appears washed out or overly saturated. Use a color balance adjustment layer to fine-tune the skin tones, ensuring they look natural and healthy. You can also use a selective color adjustment to target specific colors in the skin, such as reds and yellows, and adjust them as needed.
Maintaining Detail in the Highlights and Shadows
While it's important to brighten the couple's faces, you don't want to lose detail in the highlights or shadows. Use the highlights and shadows sliders in your editing software to recover any lost detail and ensure a balanced exposure throughout the image. You can also use the clarity slider to add a bit of definition to the edges and textures, enhancing the overall sharpness and detail of the photo.
Adding a Subtle Vignette for Depth
A subtle vignette can help to draw the viewer's eye to the center of the image, where the couple is located. It can also add a sense of depth and dimension to the photo, making it more visually engaging. Use a vignette tool or create a custom vignette using a radial gradient mask to achieve this effect. Be sure to keep the vignette subtle and natural-looking, avoiding any harsh or distracting edges.
By following these techniques and tips, you can effectively add light to backlit wedding portraits in Melbourne, ensuring your photos are both stunning and well-lit. Remember to take your time and experiment with different adjustments until you achieve the desired result. With practice and patience, you'll be able to master the art of post-processing backlit images and create beautiful wedding photos that capture the magic of the moment.